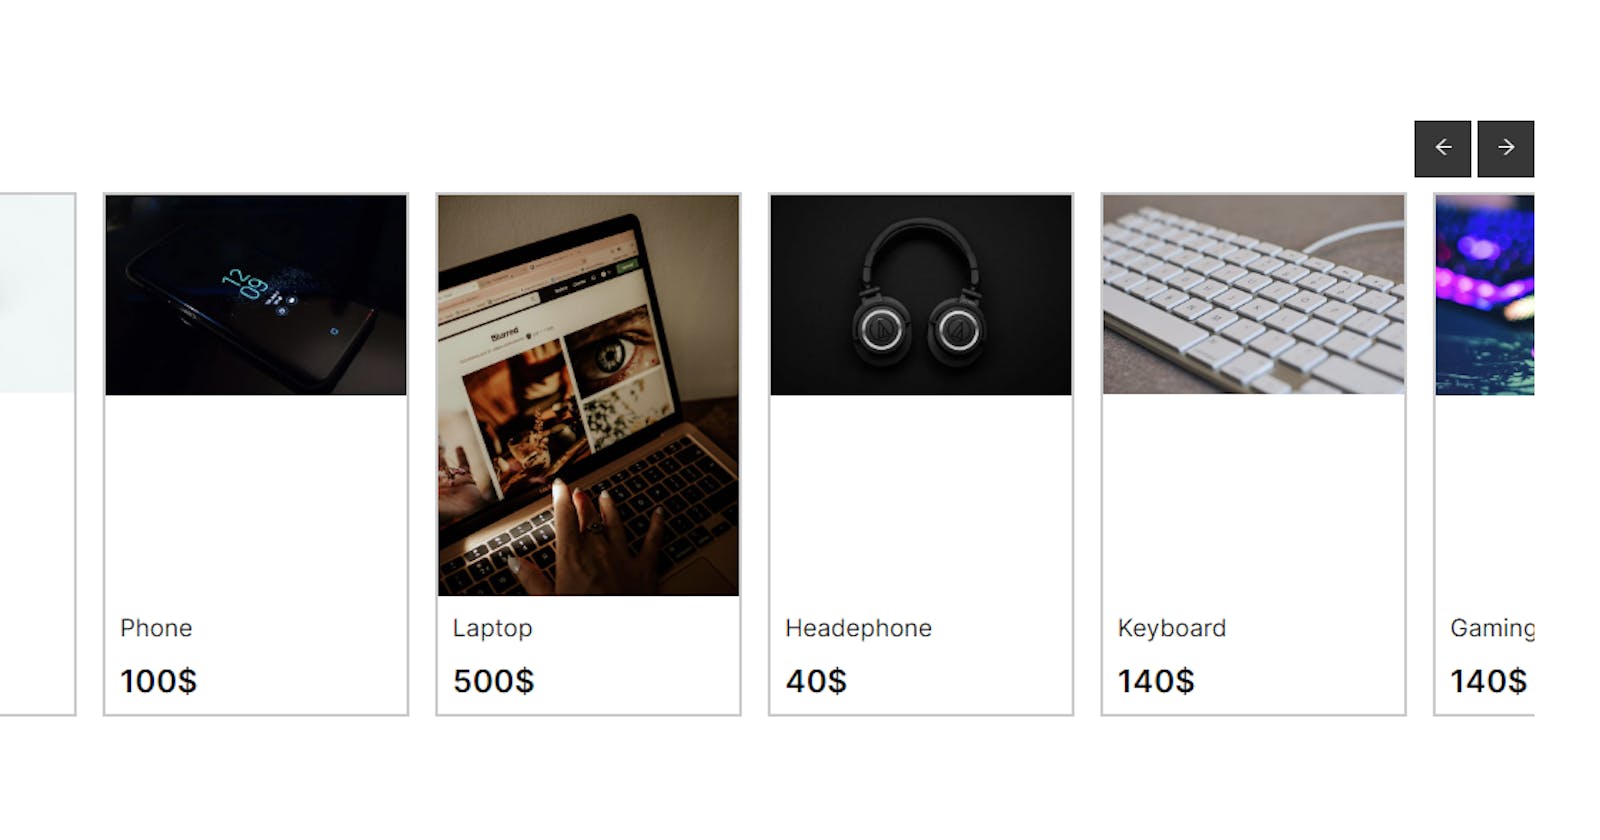
In this article, we'll walk through the process of creating a stylish trending products slider using React, Next.js, and CSS. The slider will allow users to scroll through a collection of trending products with left and right navigation buttons.
To get started, let's set up the project structure and the basic components.
Step 1: Setting Up the Project
First, make sure you have Node.js installed on your machine. If not, you can download it from the official Node.js website.
- Create a new next app using this command:
npx create-next-app@latest
Step 2: Building the Trending Products Slider
Now, let's create the necessary components and styles to build the trending products slider.
Create a new directory named
componentsin your project directory.Inside the
componentsdirectory, create a file namedTrendingSlider.jsand add the following code:
"use client"; // for nextjs 13.4 user
import Link from "next/link";
import React from "react";
import { AiOutlineArrowRight, AiOutlineArrowLeft } from "react-icons/ai";
import "./TrendingSlider.css";

const TrendingSlider = () => {
  const filteredItems = [
    {
      id: 1,
      img: "https://images.pexels.com/photos/90946/pexels-photo-90946.jpeg?auto=compress&cs=tinysrgb&w=600",
      description: "camera",
      price: 200,
    },
    {
      id: 2,
      img: "https://images.pexels.com/photos/404280/pexels-photo-404280.jpeg?auto=compress&cs=tinysrgb&w=600",
      description: "Phone",
      price: 100,
    },
    {
      id: 3,
      img: "https://images.pexels.com/photos/12753820/pexels-photo-12753820.jpeg?auto=compress&cs=tinysrgb&w=600",
      description: "Laptop",
      price: 500,
    },
    {
      id: 4,
      img: "https://images.pexels.com/photos/1649771/pexels-photo-1649771.jpeg?auto=compress&cs=tinysrgb&w=600",
      description: "Headephone",
      price: 40,
    },
    {
      id: 5,
      img: "https://images.pexels.com/photos/163117/keyboard-white-computer-keyboard-desktop-163117.jpeg?auto=compress&cs=tinysrgb&w=600",
      description: "Keyboard",
      price: 140,
    },
    {
      id: 6,
      img: "https://images.pexels.com/photos/2115256/pexels-photo-2115256.jpeg?auto=compress&cs=tinysrgb&w=600",
      description: "Gaming Mouse",
      price: 140,
    },
  ];

  const slideLeft = () => {
    let slider = document.getElementById("slider");
    slider.scrollLeft = slider.scrollLeft - 235;
  };

  const slideRight = () => {
    let slider = document.getElementById("slider");
    slider.scrollLeft = slider.scrollLeft + 235;
  };
  return (
    <>
      <div className="trending">
        <div className="container">
          <div className="title-btns">
            <h3></h3>
            <div className="btns">
              <button title="scroll left" onClick={slideLeft}>
                <AiOutlineArrowLeft />
              </button>
              <button title="scroll right" onClick={slideRight}>
                <AiOutlineArrowRight />
              </button>
            </div>
          </div>
          <div className="row-container" id="slider">
            {filteredItems.map((item) => (
              <div key={item.id} className="row-item">
                <Link href={`/`} className="link">
                  <div className="item-header">
                    <img src={item.img} alt="product" />
                  </div>
                  <div className="item-description">
                    <p>{item.description}</p>
                    <p className="item-price">{item.price}$</p>
                  </div>
                </Link>
              </div>
            ))}
          </div>
        </div>
      </div>
    </>
  );
};
export default TrendingSlider;
- Now, create a file named
TrendingSlider.cssin the samecomponentsdirectory and add the following CSS code:
@import url("https://fonts.googleapis.com/css2?family=Blinker:wght@200;400;600;700&display=swap");

* {
  margin: 0;
  padding: 0;
  box-sizing: border-box;
  scroll-behavior: smooth;
}

body {
  font-family: "Blinker", sans-serif;
  position: relative;
}

html {
  font-size: 62.5%;
}

/* global */
.container {
  max-width: 1200px;
  margin: 0 auto;
  padding: 0 19px;
  height: 100%;
  display: flex;
  flex-direction: column;
  justify-content: center;
}

.row-item {
  outline: 2px solid rgba(0, 0, 0, 0.205);
  cursor: pointer;
  transition: all 0.15s ease-in;
}

.row-item:hover {
  outline: 2px solid rgba(0, 0, 0, 0.6);
}

.trending {
  height: 100vh;
}

.item-header img {
  width: 21rem;
}

.item-description {
  font-size: 1.7rem;
  padding: 1rem;
}

.trending h3 {
  font-size: 2.6rem;
  font-weight: 600;
  margin-bottom: 4.2rem !important;
}

.row-container {
  display: flex;
  gap: 2.2rem;
  overflow-x: scroll;
  overflow-y: hidden;
  white-space: nowrap;
  scroll-behavior: smooth;
  position: relative;
  padding: 1rem 0.6rem;
}

/* Hide scrollbar for Chrome, Safari and Opera */
.row-container::-webkit-scrollbar {
  display: none;

  /* Hide scrollbar for IE, Edge and Firefox */
  -ms-overflow-style: none;
  scrollbar-width: none;
}

.title-btns {
  display: flex;
  justify-content: space-between;
}

.btns button {
  color: white;
  background-color: #373737;
  padding: 1rem;
  font-size: 1.5rem;
  border: none;
  height: 4rem;
  width: 4rem;
  cursor: pointer;
  transition: all 0.1s ease-in;
}

.btns {
  display: flex;
  gap: 0.4rem;
}

.btns button:hover {
  background-color: black;
}
.item-price {
  font-weight: 600;
  font-size: 2.2rem;
  margin-top: 1.4rem;
}
.link {
  text-decoration: none;
  color: black;
  height: 100%;
  display: flex;
  flex-direction: column;
  justify-content: space-between;
}
Step 3: Integrating the TrendingSlider Component
- Create a new file named
page.jsin your project directory and add the following code:
import React from "react";
import TrendingSlider from "../components/TrendingSlider";

const Home = () => {
  return (
    <div>
      <TrendingSlider />
    </div>
  );
};

export default Home;
Step 4: Running the Application
Run the following command in your terminal to start the development server:
npm run dev
Visit http://localhost:3000 in your web browser to see the trending products slider in action!
Conclusion
In this article, we learned how to create a trendy products slider using React, Next.js, and CSS. We built a responsive slider that allows users to navigate through the products using navigation buttons. This kind of UI component can enhance the user experience on your website and make it more interactive. You can further customize the styles and add more functionality as per your project's requirements.
